Sunday, 4 February 2018

How to get a single table Fragmentaion

How To Find a single table Fragmentation in respective database on sql server 2005\8\8R2\12\14\16, use below query to get the fragmentation information

Use Your_DB_Name
go
SELECT
                     DB_NAME([ddips].[database_id]) AS [DatabaseName]
                     , OBJECT_NAME([ddips].[object_id]) AS [TableName]
                     , [i].[name] AS [IndexName] , [ddips].[avg_fragmentation_in_percent] as [Fragmentation]
FROM          [sys].[dm_db_index_physical_stats](DB_ID('Your_DB'),OBJECT_ID('Your_DB_Table_Name'), NULL, NULL, NULL) AS ddips --Please change database name and table name
INNER JOIN    [sys].[indexes] AS i ON [ddips].[index_id] = [i].[index_id]
AND                  [ddips].[object_id] = [i].[object_id]

go

Tuesday, 19 September 2017

Installing AdventureWorks2014 Sample Database

Installing AdventureWorks Sample Database


Now the SQL Server and the management studio are ready for using. For training purpose, we need a database with some sample data. It will be very helpful to have a sample database while learning SQL Server. For this purpose, Microsoft has introduced the AdventureWorks Sample Database. Currently, AdventureWorks sample database is available in CodePlex as open source.

Downloading & Extracting AdventureWorks Sample Database

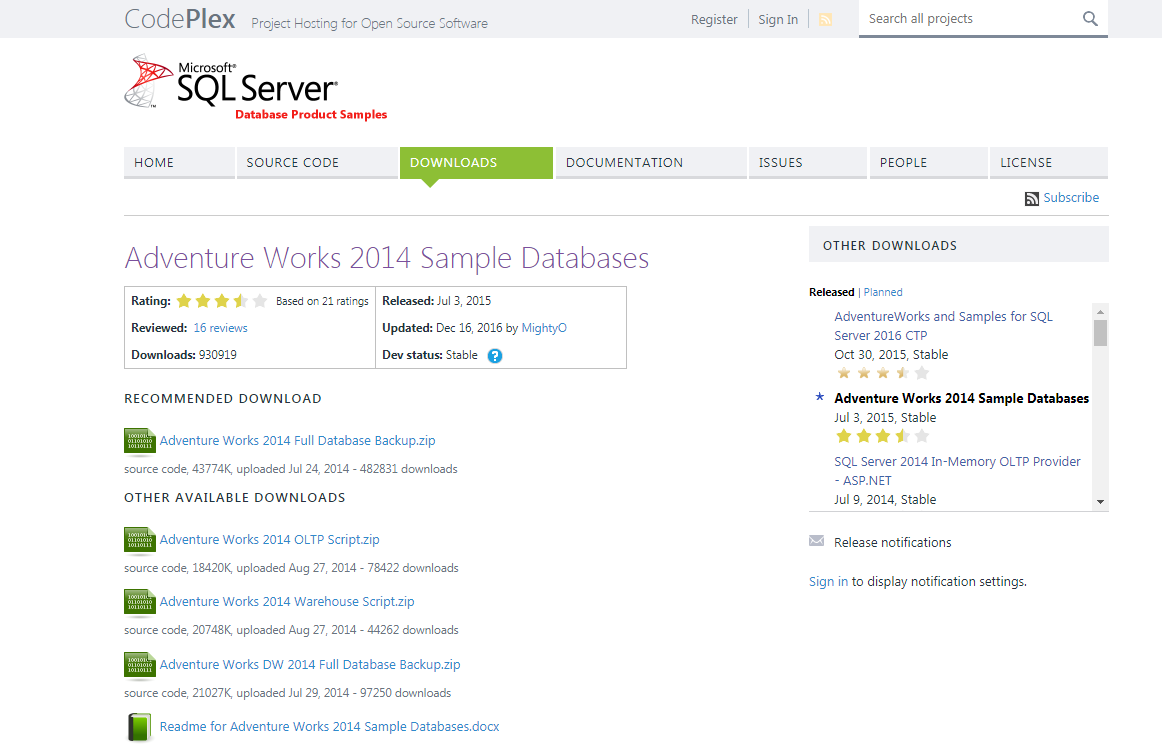
  1. You can download the sample databases for SQL Server 2014 from CodePlex. There you can see all the different types of sample databases available for download.
  2. From the list, download the Adventure Works 2014 Full Database Backup.zip below the Recommended Download Section. This is the sample database useful for learning SQL Server basics.
https://msftdbprodsamples.codeplex.com/releases/view/125550


  1. Once downloaded, unzip the file to extract the sample database backup file named AdventureWorks2014.bak.
  2. Place the backup file (AdventureWorks2014.bak) under the default SQL Server 2014 backup folder.
    • On 64 bit operating system, the default backup folder will be like C:\Program Files\Microsoft SQL Server\MSSQL12.MSSQLSERVER\MSSQL\Backup\.
    • On 32 bit OS, use C:\Program Files (x86)\Microsoft SQL Server\…..
  3. Now, follow one of the below methods to restore this backup file to the SQL Server.

Installing Or Restoring The AdventureWorks Sample Database

A. Restore Sample Database Using SQL Scripts

  1. Login to the SQL Server Management Studio (SSMS).
  2. Open a new SQL Query Editor window
  3. Copy the below code and paste it into the query editor window
    1
    2
    3
    4
    5
    6
    7
    8
    9
    USE master
    RESTORE DATABASE AdventureWorks2014
    FROM disk =
    'C:\Program Files\Microsoft SQL Server\MSSQL12.MSSQLSERVER\MSSQL\Backup\AdventureWorks2014.bak'
    WITH MOVE 'AdventureWorks2014_data' TO
    'C:\Program Files\Microsoft SQL Server\MSSQL12.MSSQLSERVER\MSSQL\DATA\AdventureWorks2014.mdf',
    MOVE 'AdventureWorks2014_Log' TO
    'C:\Program Files\Microsoft SQL Server\MSSQL12.MSSQLSERVER\MSSQL\DATA\AdventureWorks2014.ldf',
    REPLACE
  4. Click the Execute icon in the toolbar. You will see the status message as in the below picture once the database is successfully restored.
  5. You can see the restored sample database in the Object Explorer under Databases folder.

B. Restore Sample Database Using SSMS GUI

  1. Login to the SQL Server Management Studio (SSMS).
  2. In the Object Explorer, right-click  the Database folder and select Restore Database...
  3. In the Restore Database screen, choose Devices and click the ellipsis button to launch the backup device selection screen. In the device selection window, press Add button to launch the file dialog. The file dialog will open the default SQL Server backup location. As we have already placed the backup file in that location, just select the backup file in the file dialog and press OK. Again press OK in the device selection window.
  4. Now the restore database window is filled with the details of the database to be restored from the backup.
  5. Press the OK button in restore database window. The sample database backup is restored as a new database AdventureWorks2014. You can see the restored sample database in the Object Explorerunder Databases folder.
In my future article on SQL Server Basics series, I’ll be using this sample database for training.

Wednesday, 7 June 2017

List Drives using Command Prompt & PowerShell

List Drives using Command Prompt & PowerShell 


If you regularly work with the Command Prompt or PowerShell, you may need to copy files from or to an external drive, at such, and many other times, you may need to display the drives within the console window. In this post, we will show you how you can list drives using Command Prompt or PowerShell in Windows desktop version and windows servers.


List Drives using Command Prompt

Use WMIC.  Windows Management Instrumentation (WMI) is the infrastructure for management data and operations on Windows-based operating systems.
Open a command prompt and run below command:

wmic logicaldisk get name


Press Enter and you will see the list of Drives.
We can also use the following parameter:
wmic logicaldisk get caption

Using the following will display Device ID and volume name as well:
wmic logicaldisk get deviceid, volumename, description

Windows also includes an additional command-line tool for file, system and disk management, called Fsutil. This utility helps you lits files, change the short name of a file, find files by SID’s (Security Identifier) and perform other complex tasks.  You can also use fsutil to display drives. 
Use the following command:
fsutil fsinfo drives
You can also use Diskpart to get a list of drives along with some more details. The  Diskpart utility can do everything that the Disk Management console can do, and more! It’s invaluable for script writers or anyone who simply prefers working at a command prompt.
Open CMD and type diskpart. Next use the following command:
list volume

List Drives using PowerShell

To display drives using PowerShell, type powershell in the same CMD windows and hit Enter. This will open a PowerShell window.
Now use the following command:
get-psdrive –psprovider filesystem

We hope this will helps..!

Tuesday, 16 May 2017

Job failed due to No global profile is configured. Specify a profile name in the @profile_name parameter


To day there is job failed in one of the our server.

Below is the error:

No global profile is configured. Specify a profile name in the @profile_name parameter

Work around:-

We verified the profile name and default setting using below query. Profile is not set default that is the reason it got failed.


EXEC msdb.dbo.sysmail_help_principalprofile_sp;
Return Code Values

0 (success) or 1 (failure)

is _default -The flag that states whether the profile is the default profile for the user.

Solution:

1. Login into the serve
2. Open run and type SQLWB\SSMS
3. Connect to server
4. Go to maintenance tab
5. Select the Database Mail
6. Right click Database Mail and start the wizard
7. Click on next
8. Select the manage profile security
9. Click on next
10. Go to the Default profile and select Yes
11. Click on next button
12. Click on finish
13. Click on close

Then reran the job it was successfully completed with out errors.

Screen shots:


Thursday, 11 May 2017

How to Eliminate all successful backups messages in SQL server error log

We have got a one request in my organization To Eliminate the all successful backup's messages only from SQL server error log,use below trace flag.
-T3226


Normally Sql server error log contain all the information about how the sql server is running, what is happening and occurring on your database, its normally the first place you look at when you have any issue of the database. Keeping it small and as useful as it can be helps a lot when it comes to troubleshooting, since you don’t have to scan through hundreds of lines of useless information and locate the issue you might be having. Keeping it recycle on a regular interval is a good practice and should be set as default for easier maintenance.

If you have many databases within a single instance and/or have frequent backup mean that you will have all the successful backup entries written to SQL error log and makes the file grow large (and fast). If you do not have any scripts or monitoring that requires the successful backup entry in error log, it would be recommended to turn on trace flag 3226 to suppress all successful backups entries. It will, however, still write out the error entry if backup is unsuccessful, and all successful entry are still logged in msdb database.

Manually How to implement:

To manually turn on this trace flag globally, you can use the below code:

DBCC TRACEON (3226, -1)

To turn this trace off, you can just below query execute:

DBCC TRACEOFF (3226)


To see the what traces are enable globally use Trace status command:

DBCC TRACESTATUS(-1)

As above setup is a manual setup, it will not effect after service restart, to keep this setting effective after restart please use through startup parameter option.

Globally how to enable trace flag:

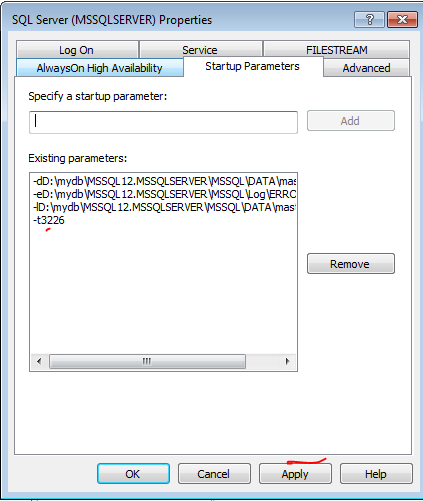
Step-1: Open sql server configuration manager through run command or startup programs
Step-2: After sql server configuration manager open select the sql server service in left pane
Step-3: In right pane select and right on MSSQLSERVER service
Step-4: click on ok properties sql server process
Step-5: Go to the advanced startup parameter tab
Step-6: Enter and add the below trace flag
-T 3226
Step-7: Apply and Click on OK, ok
Step-8: Restart the sql services.
Step-9: After restart connect to instance and open new query analyzer run below command to verify the trace flag whether enable or not.

DBCC TRACESTATUS(-1)

Or
use master
go
exec xp_readerrorlog 0, 1, 'lock'

Screen shots for above steps:


Lab test:

Let try to run this and see what happens, we are testing manual setup method mentioned above.

BACKUP DATABASE DBA_test TO DISK = 'D:\DBA_test.bak'
GO
DBCC TRACEON (3226, -1)

BACKUP DATABASE DBA_test TO DISK = 'D:\DBA_test.bak'
GO
DBCC TRACEOFF (3226, -1)

BACKUP DATABASE DBA_test TO DISK = 'D:\DBA_test.bak'
GO
--wanted make the backup fail

DBCC TRACEON (3226, -1)

BACKUP DATABASE DBA_test TO DISK = 'D:\MSSQL\DBA_test.bak'
GO
DBCC TRACEOFF (3226, -1)

From the code above, we will firstly backup the test database, enable the trace flag and perform the backup again, turn the trace flag off and perform the backup the third time. After its done, we will turn on the trace flag and wanted perform a failure backup. What we are expecting is that we should see the backup entry from the first try, nothing from the second and an entry for the third. The reason for the last part is to ensure that even if we have the trace flag on, we will still get failure backup entry in error log. Let check the result:


The above result in screen shot match's what we are expecting. we can conclude is that if you are not depending on the successful backup entry in SQL error log, you can enable this trace flag to minimize the number of entries in it.

Disable CDC at table level

 How to Disable CDC( Change Data Capture) for tables Change Data Capture (cdc) property is disabled as default.  here I will Query you how t...